There are a few tricks to shading/floating on craft projects and SnodCraft would like to offer some helpful hints. Few pieces leave our shop without shading; even the birdhouses get light contrast shading under eaves, over windows; even around hand painted trees and shrubs. Magic happens when you add shading to your craft projects and the key to mastering it is lots of practice – well worth all efforts!
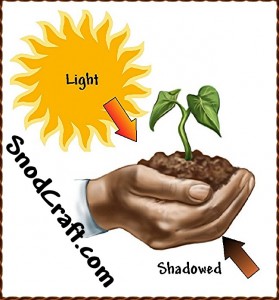
Where to add shading you may ask. If you are following a pattern most artists will mark the area to be shaded, or they will tell you in the instructions exactly where to add shading. That will take the guess work out of where to shade. However, the basic rule of thumb for shading is simple – any area touched by light always has a contrasting shadowed area. Envision where the light source is and then float a shadow on the opposite side. Another rule of thumb: Every shadowed area should have a highlighted area. Lets say you float a shadow under the fingers opposite the light source (see picture), then the next step is to float a highlight on the top of the fingers. Slightly darker paint color than the original skin color for the shadow; a slightly lighter color or an off white color for the highlight. As I said, magic happens!
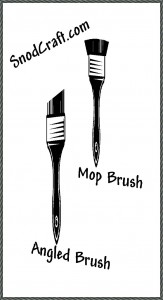
The first step in mastering a good float is in the paint brush. SnodCraft recommends a high quality angled brush made for acrylic paints – don’t skimp on your brush purchases! Trusted brand names in brushes: Loew/Cornell, Golden Taklon, and Papillon. (Papillon is an exclusive brand name available through our Artist Club link). Angled brushes come in varied sizes. Our favorite size is a 3/8″ angled brush because it fits into small spaces; works well in the larger areas plus provides the desired control we prefer, but try various sizes until you find the size best suited to your needs.
Getting started – have at the ready: clean water, a slightly damp soft rag, paper towel and palette paper or a plastic paint tray. Wet your angled brush in the clean water and drop the extra amount of water onto your palette paper or tray. Blot the brush on the paper towel to remove any excess water and then place the longer tip of your brush into the paint and pick up a very small amount of paint. Mix the paint with the water on your palette paper or paint tray. Apply pressure and “work” the paint into the brush tip until an even mix of water and paint appears. If the mixture seems too thin add a small dab of paint; if too thick add more water. The heavier concentration of paint should be on the tip of the brush with little if any paint showing on the short angle of the brush. If too much paint has worked into the short side, squeeze the excess out with your finger tips. Once you feel comfortable with the blended mix of water and paint, float your shadow. If you are not satisfied with the floated brush stroke remove it quickly with your damp rag. Adjust the mixture in your brush – water to paint ratio, and try again. If the float appears too light for your tastes, let it dry and do another application – layering your floats will give you a softer more dimensional effect. Some crafters prefer to pre-moisten the painting surface with water before floating and then use a mop brush to soften the float instead of removing it with a damp rag. Relax and try each suggested method and then stay with the one that works the best for you. Again, the key word is practice!
Happy Painting!
Tags: educational, floating, painting, paints, projects, shading
What do you mean by the longer tip of your brush, and what is a mop brush? Showing illustrations of what you are saying is helpful like the hand shading. Could you show “the longer tip of your brush” in an illustration and what a mop brush is?
I like the fact that you said “if the float appears too light for your tastes, let it dry and do another application.” I always tend to be impatient and think I have to quickly wipe off the paint and start completely over.
Love those questions! We recently added a picture of an angled and a mop brush to the blog article about shading/floating. I hope that better explains the look for both brushes. If you think you’d like to try a mop brush, look in the Donna Dewberry line of paint brushes. I use the mop brush occasionally, but tend to put my damp wet rag into use more often. Still, it’s always good to try a different approach, and a mop brush might work really well for you. Thanks for your questions and comments. Always love hearing from you! Best regards, Donna
Thank you for adding a picture of a mop brush and angled brush. Probably seems like a very basic thing, but I am a beginner and need all the help I can get.